Crispy Seasond Kale Chips
Kale chips have taken the snack world by storm, and for good reason. Not only are they a delicious and satisfying snack, but they also offer a multitude of health benefits. Kale is a nutrient-dense vegetable that is packed with vitamins and minerals, making it a great choice for anyone looking to improve their health and wellness.
But not all kale chips are created equal. The key to making the perfect crispy seasoned kale chips lies in the seasoning and preparation. With the right combination of spices and a little bit of know-how, you can create a snack that is not only healthy but also incredibly flavorful. In this article, we’ll explore the benefits of kale chips, offer tips on choosing the best seasonings, and guide you through the process of preparing and baking your kale chips to perfection. Get ready to enjoy a delicious and nutritious snack that will satisfy your cravings and keep you feeling great.

The Benefits of Kale Chips for Health and Wellness
Eating kale chips is like giving your body a crunchy hug full of vitamins and nutrients. Kale is a cruciferous vegetable that is packed with antioxidants, fiber, and vitamins A, C, and K. It is also a good source of minerals such as calcium, potassium, and iron. When kale is baked or dehydrated into chips, it becomes a healthy snack option that is low in calories and high in nutrition.
One of the benefits of kale chips is that they can help support a healthy immune system. Kale contains vitamin C, which is a powerful antioxidant that helps fight off free radicals and prevent cellular damage. Vitamin C is also essential for the production of collagen, which is important for maintaining healthy skin, bones, and connective tissue. By incorporating kale chips into your diet, you can boost your vitamin C intake and support your body’s natural defenses against illness and disease.
Choosing the Right Seasonings for Your Kale Chips
To make your kale chips burst with flavor, you will want to select just the right blend of spices and herbs. There are countless options to choose from, so it can be overwhelming at first. However, once you find the perfect combination, you’ll never want to go back to plain kale chips again.
One important factor to consider when choosing seasonings is the taste profile you’re going for. Do you want something spicy, savory, or sweet? Some popular options include garlic powder, paprika, cumin, and chili flakes for a spicy kick, while rosemary, thyme, and oregano can add a savory touch. For those with a sweet tooth, cinnamon and nutmeg can be a delicious addition. Experiment with different combinations to find what suits your taste buds best.

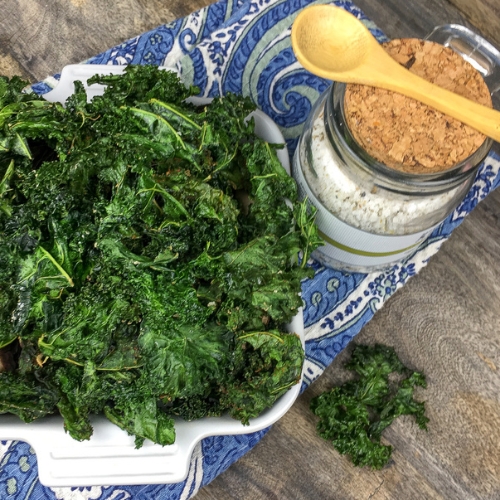
Crispy Seasoned Kale Chips
Ingredients
Ingredients:
- 2 large bunches kale tough stems removed and torn into chunks
- 1½ – 2 T. extra virgin olive oil.
- 1 T. smoked paprika.
- 2 t. garlic powder
- 2 t. ground cumin
- Sea salt to taste
Instructions
Directions:
- Preheat oven to 325°F and line a large, rimmed baking sheet with parchment paper or a Silpat® baking mat. Set it aside.
- Wash kale leaves and dry completely before adding them to a large mixing bowl. Drizzle with a little olive oil and toss to combine while rubbing each leaf with your fingers to make sure it is evenly coated in oil.
- Sprinkle smoked paprika, garlic powder, and cumin on top of kale and season with sea salt, to taste. Toss until evenly combined.
- Arrange seasoned kale leaves on prepared baking sheet in a single layer, being careful not to overcrowd them. Work in batches, if necessary.
- Place baking sheet in pre-heated oven and bake for 5-6 minutes before rotating the pan. Bake for another 1-2 minutes. Do not overcook. Remove chips from oven when they are still mostly green, with only a tiny bit of brown developing.
- Let chips sit for 2-3 minutes to crisp up a bit more before serving. Enjoy!
Notes
Preparing Your Kale for Optimal Crunchiness
Achieving the perfect crunch on your kale requires some preparation, and you’ll want to start by removing the tough stems and tearing the leaves into bite-sized pieces. Kale leaves have a fibrous stem that can be tough to eat and take away from the overall texture of the chip. Therefore, it’s essential to remove the stem carefully and discard it before seasoning and baking your kale chips.
After you’ve removed the stem, it’s time to tear your kale leaves into bite-sized pieces. Tearing the leaves instead of cutting them will help keep the kale’s natural shape and prevent the leaves from becoming too small or too large. You’ll want to make sure that each piece is coated evenly with seasoning and that there is enough space on the baking sheet to allow for air circulation. With these simple preparation steps, you’ll be well on your way to achieving crispy and delicious kale chips.
Baking Your Kale Chips to Perfection
Now that your prepped kale is ready, it is time to pop them in the oven and let the magic happen! Preheat your oven to 350°F. Spread your kale leaves on a baking sheet, making sure they are not overlapping. Sprinkle them with your preferred seasonings, such as garlic powder, salt, or nutritional yeast. If you want to add a little extra flavor, you can drizzle a small amount of olive oil over the kale. Be careful not to add too much oil, as this can make your kale chips soggy.
Bake your kale chips for 10-15 minutes, checking on them occasionally to make sure they are not burning. The edges of the kale should turn slightly brown, but not black. Once your kale chips are done, remove them from the oven and let them cool for a few minutes before digging in. Enjoy your crispy, delicious kale chips as a healthy snack or side dish.
Serving and Storing Your Crispy Seasoned Kale Chips
When you’re ready to enjoy your tasty kale chips, grab a bowl and fill it up with your perfectly baked leaves. These crunchy and delicious chips are best enjoyed fresh out of the oven while they’re still warm and crispy. However, if you have leftovers, don’t worry! Store them in an airtight container or ziplock bag to keep them fresh and crispy for up to a week.
When storing your kale chips, make sure to remove any excess air from the container or bag to prevent them from getting stale. You can also add a small packet of silica gel to absorb any moisture and keep your chips extra crispy. When you’re ready to enjoy them again, you can either eat them as is or reheat them in the oven for a few minutes to bring back their crunchiness. With these easy storage tips, you can enjoy your crispy seasoned kale chips anytime!
Frequently Asked Questions
Conclusion
In conclusion, crispy seasoned kale chips are a delicious and healthy snack that can easily be made at home. Not only are they packed with nutrients and low in calories, but they also satisfy cravings for salty and crunchy snacks. By choosing the right seasonings and preparing the kale properly, you can create a snack that is both flavorful and crunchy.
When baking your kale chips, it’s important to keep a close eye on them to prevent burning. Once they’re done, they can be enjoyed immediately or stored in an airtight container for later snacking. So next time you’re looking for a tasty and nutritious snack, give crispy seasoned kale chips a try – your taste buds and your body will thank you!


